
Personalizing Sitefinity Content with HubSpot: Video Series


Sitefinity CMS launched version 13.1 in August of this year and it has some great features that are beneficial to marketers. One of those features is personalization based on HubSpot. Personalization allows marketers to personalize the content on their website based on information that is known about a specific user or group of users, also known as a user segment.
In this video series, Brad Hunt, our president, and Progress Sitefinity MVP will show you step-by-step how to personalize the content on your Sitefinity website based on a custom property in your HubSpot CRM.
In order to do this, you will need the following components:
This video series consists of three parts:
- Part 1: Connecting Sitefinity to HubSpot
- Part 2: Configuring Personalization in Sitefinity
- Part 3: Configuring Sitefinity Insight
Part 1: Connecting Sitefinity to HubSpot
This is the introduction and part 1 of our video series for how to do personalization in Sitefinity with Hubspot. The video will provide an overview of personalization and go through the process of connecting Sitefinity with HubSpot. For an in-depth overview of the video and for more information on personalization and its importance, continue reading below the embedded videos.
Part 2: Configuring Personalization in Sitefinity
In part two of our video series for personalizing Sitefinity with HubSpot, we will cover how to configure personalization in Sitefinity.
Part 3: Configuring Sitefinity Insight
In part three of our video series on Personalization in Sitefinity with HubSpot, we will show you how to integrate Sitefinity Insight. Sitefinity Insight is a stand-alone SAS to which your Sitefinity instance connects which allows the data to be sent back and forth between the two systems.
In addition to the videos above, we've included some extra material below that talks a little bit about the importance of personalization, the planning and brainstorming process for a personalization campaign, and also written outlines for each video in this series. Most of the information provided below is covered in the videos.
Why Personalization?
The statistics on personalization speak for themselves. Consumers want personalization. According to Accenture, "91% of consumers are more likely to shop with brands who recognize, remember, and provide relevant offers and recommendations." Personalization leads to better digital user experiences and an increase in user engagement because it offers content that is most relevant to the user by using site engagement data or contact property data from a CRM, like HubSpot.
Brainstorming, Planning, and Choosing the Focus of Your Personalization Campaign
In the video, the campaign that we create highlights Smooth Fusion’s Sitefinity CMS upgrade service on our homepage to users that are on older, non-supported versions of Sitefinity. As with many CMS platforms that have been around for a long time, older versions are typically retired from support (you can find retired versions in the Sitefinity Lifecycle Policy Guide). This makes it important for customers on older versions of a CMS, like Sitefinity, to upgrade. Upgrading your Sitefinity CMS has numerous benefits like enhanced security, performance, and new functionality (like personalization).
We came up with this campaign by brainstorming, planning, and ultimately coming up with a simple personalization strategy. Formulating key observations and a rationale for creating personalized content will help to ensure the success of your campaign. It's important to first ask why you are creating the campaign? Who will receive this content? What content, solution, product/service will you highlight? Where on your site will you offer this content? And finally, what action do you want your site visitor to take? Simply put, what's the goal of this personalization campaign?
We created a list of these key observations and rationales that helped us plan our campaign. Here it is:
- Sitefinity has been around for a long time
- Older versions of Sitefinity are no longer supported
- Customers on old versions need to upgrade
- Smooth Fusion offers upgrade services
- Customize home page with special content for users on older, non-supported versions
- Drive users to request upgrade services
With your campaign planned, you're ready to begin the process of personalizing site content. Continue reading below or watch the video series to start personalizing your Sitefinity website.
Part 1 Video Outline: Connecting Sitefinity with HubSpot CRM
In Part 1, we walked you through how to connect your Sitefinity CMS to HubSpot using the HubSpot connector, mapping form fields in your Sitefinity forms, and ensuring form settings are set-up correctly.
How to Connect Sitefinity to HubSpot
This process first starts by logging into your Sitefinity CMS, going under Administration, and scrolling to the bottom of the list to select Connector for HubSpot. On the page, you will be prompted to enter both your Hub ID and API Key. Your Hub ID or HubSpot account ID will be found in the drop-down for your profile.
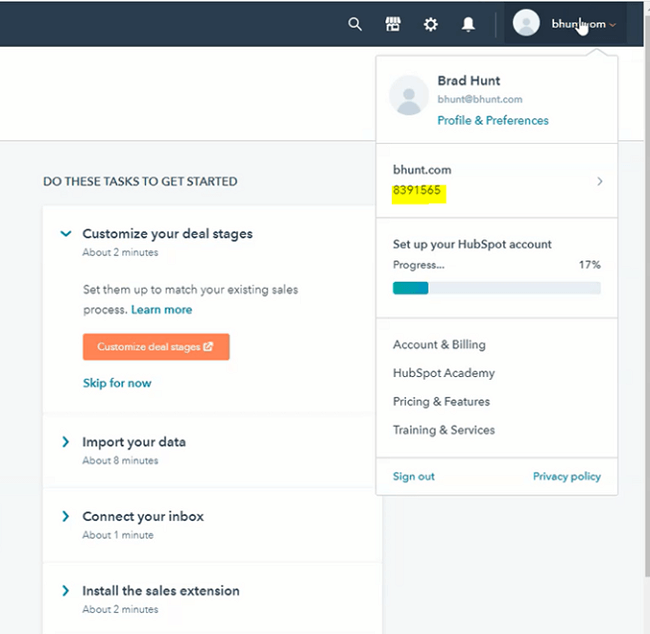
Next, you will need to find your API key in HubSpot. Go to Profile and Preferences and on the left navigation, go to Integrations and select API key. If this is a new HubSpot account, then you won’t have an API key when you first get there so you will need to select the Create key. You will then copy the API key to your clipboard, go back to Sitefinity and paste the key into the field, and then Connect.
Capturing data in Sitefinity and sending it over to HubSpot
The first step would be to create a form in HubSpot. What you are basically doing is connecting a form in Sitefinity to a form in your Hubspot CRM. In HubSpot, go to the marketing tab and select forms in the dropdown. Once you get to the form page you will select, Create a free form. HubSpot will then ask you what type of form you would like to create. This part doesn’t matter because we won’t be using the HubSpot interface to present the form. In the video, we chose a contact us form from HubSpot’s form template options and hit next to begin customizing the form. Once you’re satisfied with your form, you can give it a name that is simple yet easily recognizable and then publish the form.
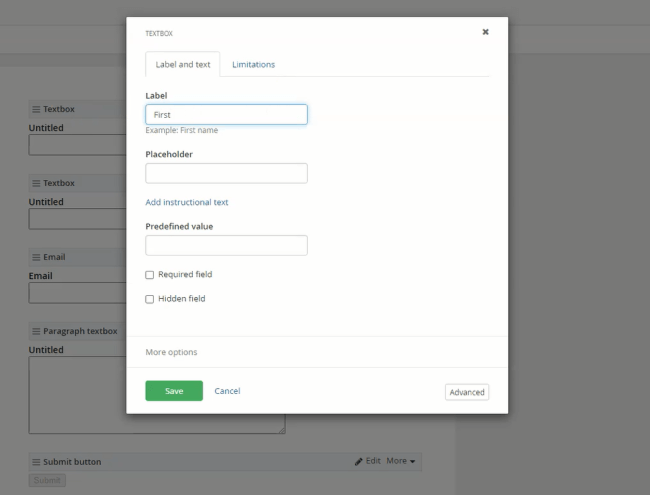
Now, go back into Sitefinity and select the dropdown for Content and then choose Forms. In Sitefinity, you will recreate the same form that you created in HubSpot. Name your form and select the button to create and go to add fields. You will drag and drop the form fields onto the page. You will notice there aren’t fields for a first name or last name in Sitefinity. You will use the Textbox field and select edit on the widget to customize the name of the field. There is a widget for email so you won’t have to edit the field label, just drag and drop it on the page. While editing the label name of a field, there’s also an option to make the field required or create other types of validation.
When you are done editing the fields, publish the form.
Expand the section for Send form data to external applications and you will see a field for HubSpot form name. Here you can begin typing the name of the form and the API should pick-up the name of the form to select.
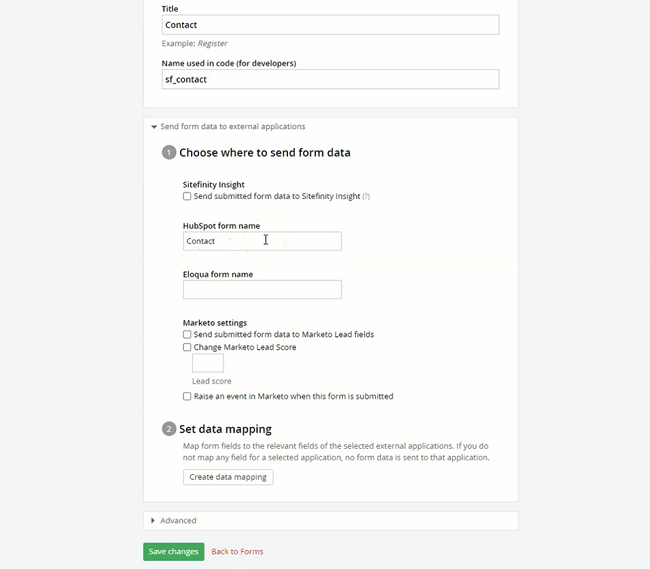
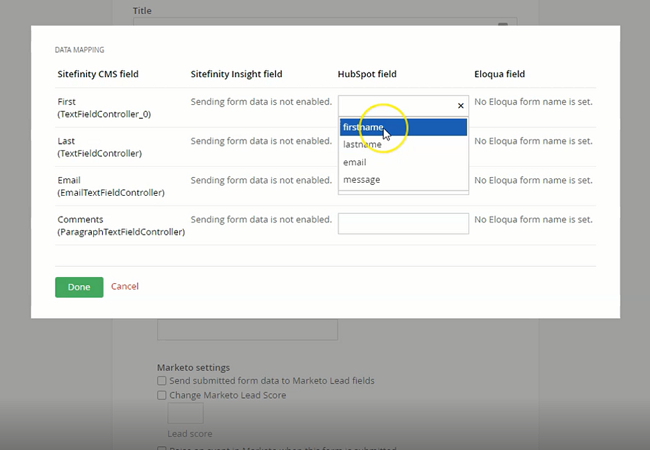
Here’s the important part, mapping the form fields on your Sitefinity form to the form fields on your HubSpot form. You’ll see the next step (2) named Set data mapping, click on the button to Create data mapping.
Under the Hubspot field column, you can begin mapping the fields by clicking in the field and the field names should show in the drop-down selection. Select the correct form field for each and click done.
The next step after mapping the form fields is to build a page that will host your newly created Sitefinity form. Go to Pages, select Create a page, name your page, and continue. Once you select your template and the page opens in the editor you can style your page and add any copy you’d like. At this point in the video, we dragged a container on the page that keeps the formatting of content consistent across our site. ( Read our blog and watch our video on Best Practices for Building a Page in Sitefinity). You’ll go to Content on the right-hand nav and drag and drop the form widget into the container or page. Next, click on Select a form and choose the contact form that was created.
Another important step is to click on edit and go to the tab named HubSpot and make sure that you select the option for Post data to HubSpot under HubSpot settings and click Save. This step is important because if you don’t do this, it won’t send your data to HubSpot. Now it’s time to publish this page.
The final step to ensuring a proper connection between your forms is to test it. Go to your live site, fill out the form, and submit. Once the form is submitted, check-in HubSpot to see if a new contact was recorded.
If you go to your forms in HubSpot, you may have a new form now listed title, “Unidentified Form” with the date. This is because, by default, any non-HubSpot form that is filled out from a property connected with your HubSpot API will be captured in HubSpot.
To turn off this functionality, go to your HubSpot settings. Go to Marketing and then Forms. There’s a tab for Non-HubSpot Forms, where you will turn this functionality off.
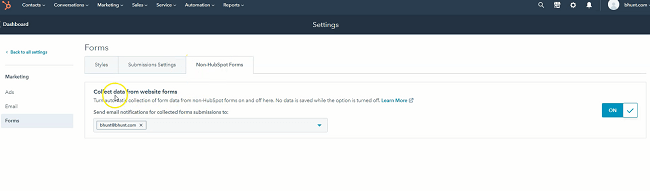
Now, you won’t have that extra form submission every time a form is submitted from your website. You can then go back to your forms and delete the unidentified form.
In this part of this series, we showed you how to connect your Sitefinity CMS to HubSpot using the Hub ID and API key. We then created a form inside of HubSpot and connected a Sitefinity form to it by mapping fields in Sitefinity.
Part 2 Video Outline: Configuring Sitefinity with HubSpot to Create Personalized Content
In part 2 of this video series, we configured Sitefinity and HubSpot by creating a user segment in Sitefinity, setting up a custom property in HubSpot, and then we created the personalized page in Sitefinity by referencing the data from HubSpot.
Whenever you start to personalize content in Sitefinity, you do that around a specific segment of visitors to your site so it's important that you take the necessary steps to ensure that personalization is configured correctly. Let's start by adding a segment in Sitefinity.
Adding a segment in Sitefinity
In Sitefinity v.13.1, two HubSpot characteristics have been added to segments, Score and Contact property. For our video example, we used contact property.
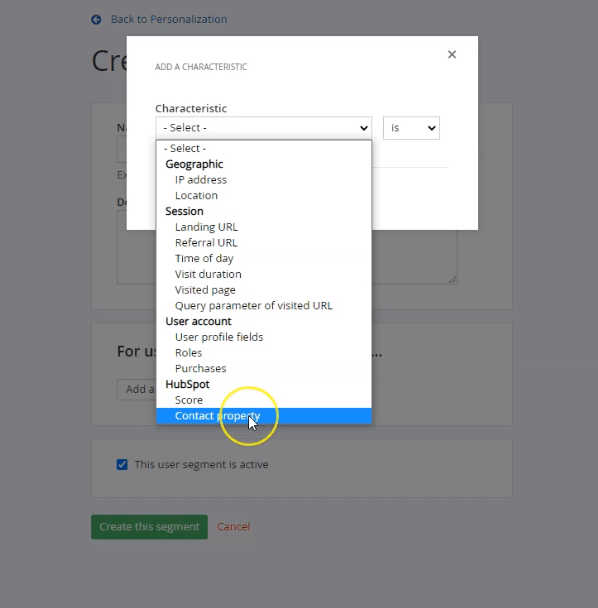
When you choose contact property, you can start to explore the various contact properties being pulled into Sitefinity from the HubSpot API. For the example in our video, we are trying to tailor content to people that are on an older version of Sitefinity.
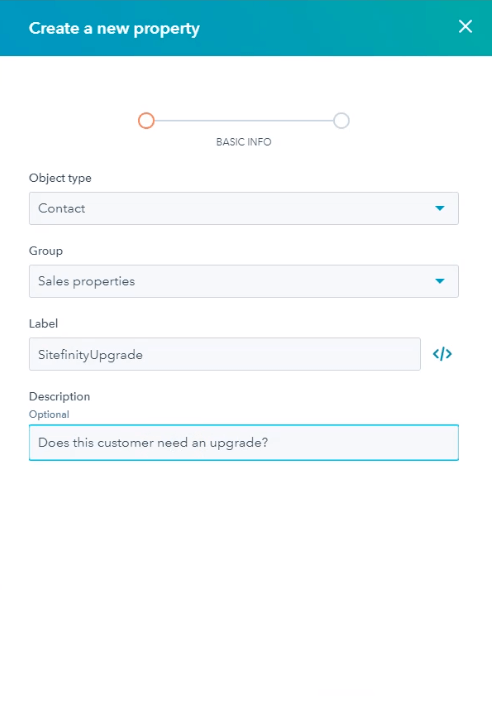
Next, you will set-up the custom property by providing key details. Here’s what we filled out in each field below.
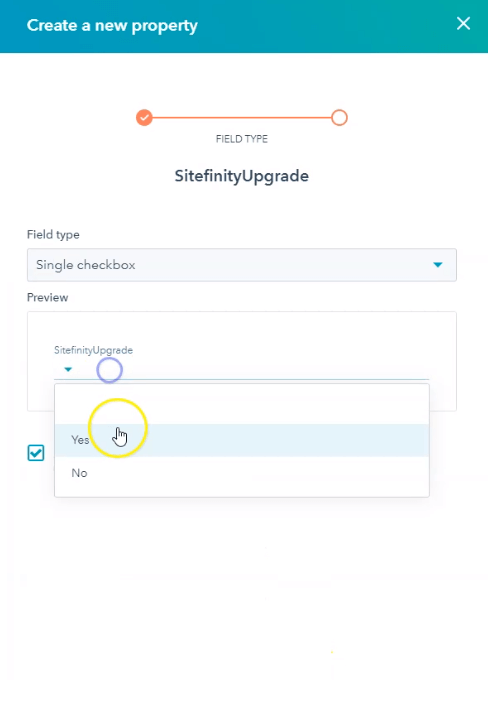
On the next screen, we chose the field type as a single checkbox, which will make the options for your property either yes or no. Click Create.
To change a contact's custom property in HubSpot, you will go to the individual contact, go to View all properties. Scroll down to the property and update it.
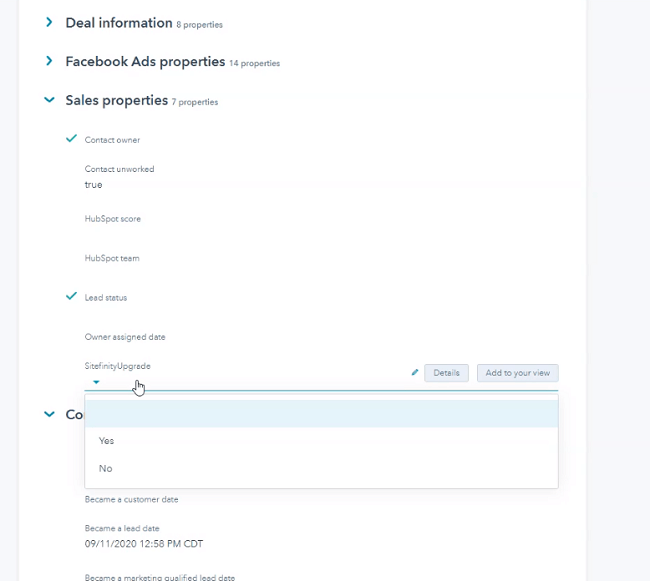
Now we will go back to Sitefinity and create our user segment. We named the segment "Sitefinity Upgrade" and a characteristic will be added. The characteristic will be based on the contact property that was created in HubSpot called "SitefinityUpgrade".
Note: It may take a few minutes for your new contact property to show up in Sitefinity. If it’s not showing, hit cancel, count to 10 seconds, and try to add a characteristic again.
In our case, we want the user segment to be those who need a Sitefinity upgrade, so the value is set to "Yes". Save and then Create your segment .
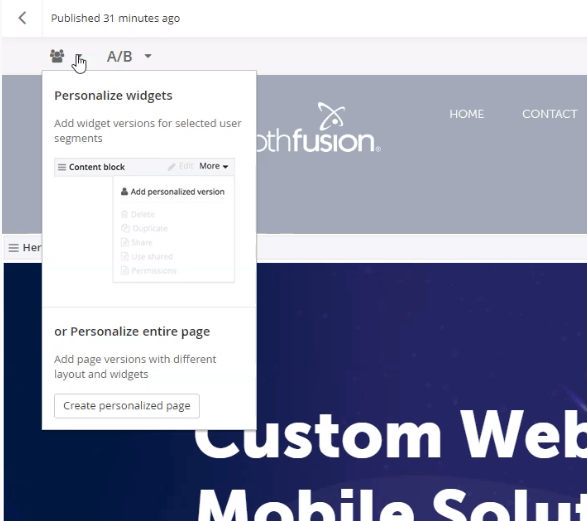
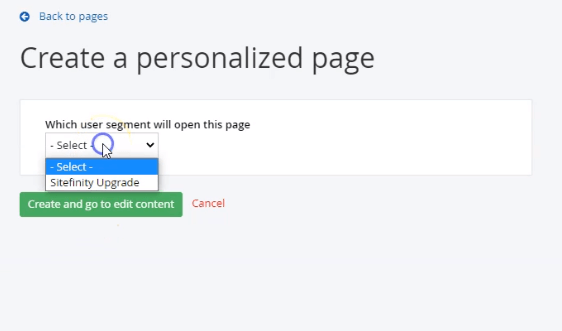
When previewing you can select the user segment in the options to the right. Once you confirm that everything looks good, publish the content.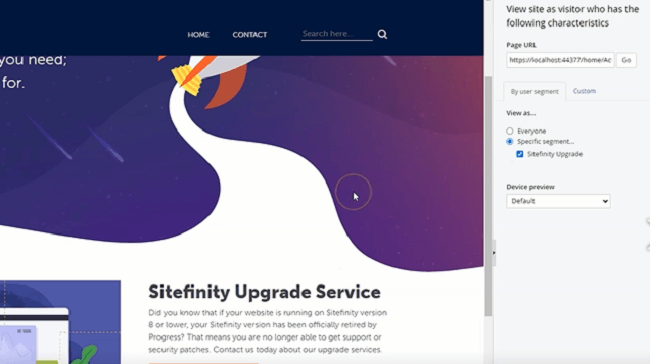
Now we are ready to test and see if this personalized content works for someone who has an older version of Sitefinity. To do that, you will go back to the live site.
Note on clearing cookies when testing your Sitefinity form: One thing that’s pointed out in the video demo is that whenever you are using HubSpot and Sitefinity, it’s basically setting a cookie that HubSpot is reading. There’s a browser plug-in called, EditThisCookie , which allows you to look at all the cookies being fired while on a specific webpage. It’s important to be aware of this because if you keep using the same cookie over and over it’s actually not going to create new users, it’s just going to update the properties of that same user. What we do in the video is delete or clear all the cookies to give us a fresh browsing session on the site.
Once on the site, go to the contact form or wherever you added your form and fill it out. Once submitted, you should be able to see a new contact in HubSpot. We’ll go to the contact details and update the contact property field we created previously to “Yes” for Sitefinity Upgrade.
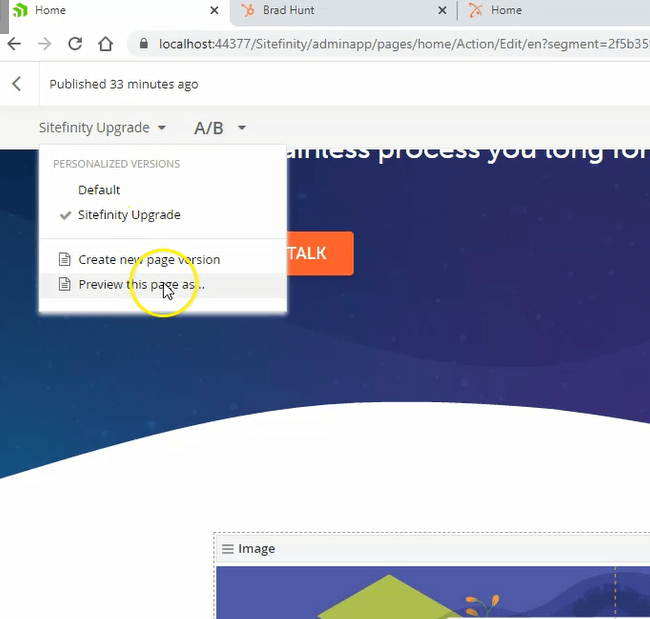
Now, when going back to the homepage, you’ll see that the "Sitefinity Upgrade Service" content is now being displayed.
This is how you create personalized pages in Sitefinity CMS based on a contact property in HubSpot. In the section, Part 3, we will show you how to connect Sitefinity Insight.
Part 3 Video Outline: Configuring Sitefinity Insight
In this part of this video series, we configured Sitefinity Insight so we can begin capturing user data when someone fills out a form on our website.
Go to Administration drop-down in your Sitefinity dashboard and select Sitefinity Insight. If for some reason that doesn’t show up for you, check under Modules and Services to ensure the Sitefinity Connector module is there and enabled. Make sure this is enabled before you start this process.
When you go to Sitefinity Insight, you will be prompted to add an access key. This is when you will go to the Sitefinity Insight website. Go to administration and create a new data center. Name your data center and create it.
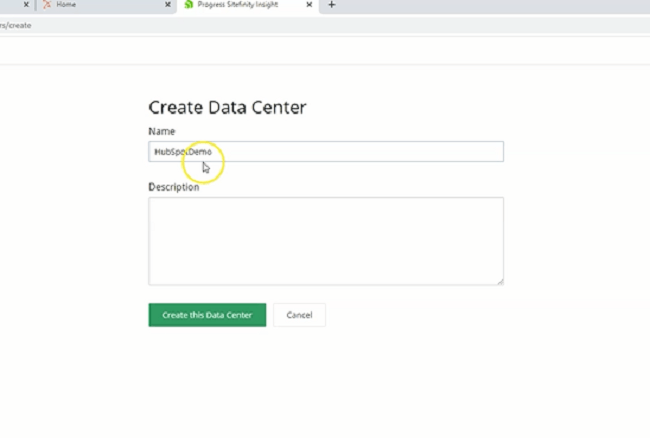
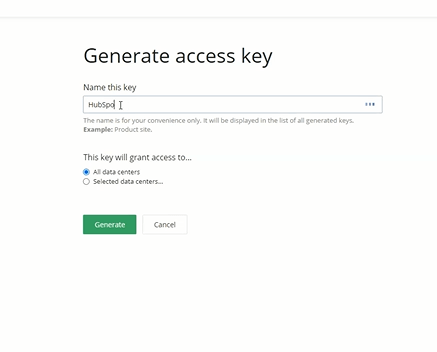
Now that the data center has been created, you will go to your new data center to retrieve the access key. Go to Administration in the upper right menu and in the left nav go to Access keys. Click on; Generate access key, and name the key. In our example, we named it "HubSpotDemo". You will then grant the key access to a data center. We only selected HubSpotDemo, which is the data center we just created. Click Generate and then copy your key.
Once your key is generated and copied, go back over to Sitefinity and paste the key into the Connector for Sitefinity Insight and hit Connect. The connection will now be made.
Site tracking set-up in Sitefinity Insight Connector
Once Sitefinity Insight is connected to your Sitefinity instance, you will need to set the site tracking. Click on Set tracking. You will then select a data center and the sites to track in the selected data center. In our example, we selected the default site we set-up in video 1.
![]()
By setting up site tracking in Sitefinity, there’s a lot of different user interactions on your site that will now be captured automatically just by using Sitefinity Insight.
Setting up a conversion in Sitefinity Insight
In this video, we also show how to set-up a basic conversion in Sitefinity Insight. A conversion in Sitefinity Insight is if someone completes a specific action on your website. The conversion example we show you in the video is tracking if someone completes the Sitefinity upgrade form.
For this, we created a new form on the website that captures the data for someone looking to upgrade their website, and then in the same way we mapped the field to HubSpot in our previous video, we mapped fields of this form to Sitefinity Insight.
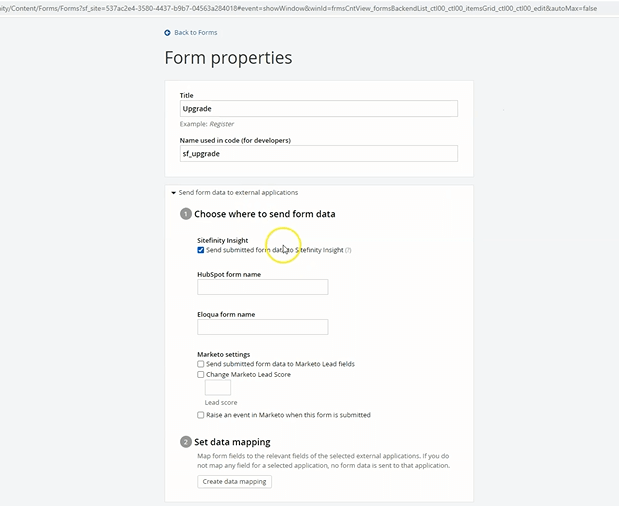
If you remember from the previous form we set-up, you will go to Actions and then Properties to send the form data to your CRM or external SAS platform.
In properties, you need to make sure the box is checked under Sitefinity Insight for Send submitted form data to Sitefinity Insight. You will then set the data mapping on the fields which is similar to how we mapped the form fields to HubSpot in video 1 of this series.
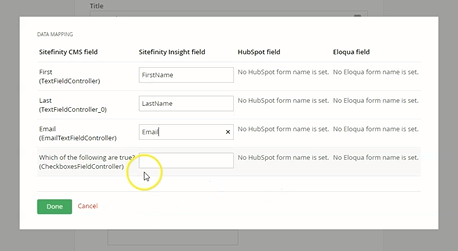
Once fields are mapped, you can save the changes. In the video, we also went back to the contact form to repeat the process of sending the form data to Sitefinity Insight, since in the previous video we just had it being sent to HubSpot.
Now all of the forms are mapped and Sitefinity Insight will start getting this information.
The next thing is to build a new page with a form widget to display the Sitefinity upgrade form we just created.
Creating a conversion in Sitefinity Insight
Once we verified that the form and page are published and set-up correctly, we’ll go back to Sitefinity Insight to create a conversion.
In our example, we are creating a conversion based on whether someone has filled out a form. So we set up the conversion to trigger if someone submitted a form on the page that contains “contact”, which is the URL for the page our contact form is on. We also created a conversion for visitors who fill out the Sitefinity upgrade form. Now, once site visitors complete these forms, that data will show up in Sitefinity Insight as a conversion. We will also be able to see the result of personalization efforts and see if anyone has converted and gone from an anonymous user to a lead. Once someone becomes a contact or lead they are now a known user and you can see their user journey through your site. Also, the data we get from Sitefinity Insight can be used to measure the effectiveness of our personalization efforts.
The main focus of video 3 in this series was to show how to connect Sitefinity Insight and how to map the form fields. In a future video, we will dig deeper into how to analyze and interpret the data in Sitefinity Insight.
In this video series, you learned how to create segments based on a contact property inside of HubSpot, how to personalize data, and then sending data that data to Sitefinity Insights for additional tracking and analysis.
We hoped you enjoyed this series. If you have any questions on this topic or any other topics related to Sitefinity, we’d like to talk with you. And if you have any suggestions for a topic that you would like to see covered, please fill out our contact form and let us know.